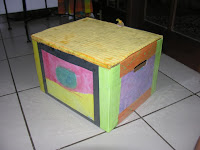
Secondly...we teach them to recycle...to be mindful of the planet & to protect it. And how do I do that you ask? There are many ways & each person has their own unique way of contributing to it. Mine is simply this - before you go out & spend on more storage space, more this & more that - you spend some time & utilise a little bit of something you often think you've perfected after becoming a mother.....CREATIVITY!! Let's face it - it takes some creativity to explain that there really IS a Santa Claus!!
So - I put my creativity & my kids' creativity to good use PLUS I recycled & re-used. What a fab combination!!
WARNING : This project comes with preparation prior to the actual finishing stage AND it takes at least an hour & a half of child-free time to complete! Of course - if you're feeling adventurous & depending on your kids' ages - you may want to make it a group project....if you decide the latter....you are BRAVE indeed!
Prep work includes collecting some of your kids paintings - collect as many of them as you can so that you have the freedom to decide on your colour scheme. In addition - have some fun whilst they are painting - paint some of your own! DO remember the colour scheme you have in your kiddies room/s & try to match it...otherwise your work of art will not look great.
My kids have colourful curtains - which are largely bright orange. But in general colour is the order of the day in their room & lots of it.
STEP 1 : I started with a FedEx 10 Kg box - then selected 2 pictures painted by C1 & C2. First I stuck a plain brown paper on the bottom of the box & then glued the 4 paintings onto the 4 walls of the box.
FedEx 10 Kg Box - C1's (5 Years) painting on the front & C2's (2 Years) painting on the floor on the left with bottle of glue, ready to be stuck on.
STEP 2 : Next I selected some of my own paintings - I had simply painted several sheets in one plain colour each - so I had 5 different colours as well as some abstract colourful painted designs of my own.
I cut 2 of my plain-coloured sheets - 1 lime green & 1 yellow (are you beginning to get an idea of COLOURFUL here??!!) - into half each & used these to frame the edges.
This image shows C1's painting & C2's painting glued onto box & the corner strip cut from plain yellow sheet
STEP 3 : I then worked on the cover - this I chose to cover with a fluffy bright coloured fabric. Et voila! Finished product shown below - kiddies had a new toy box.
You can really get creative - if you have some left over fabric or paintings you can make other stuff - I made a pencil holder out of an old container that came with cotton wool balls & two empty yoghurt cups cut to different sizes.
Pencil Holder
And THAT is how you teach your children to re-cycle PLUS - my kids like the box so much they feel like putting stuff in it....most of the time!!


No comments:
Post a Comment